

New to WordPress?
Lots of our clients really love working with WordPress. Even large companies and big non-profits have made the transition with us to WordPress over the last few years to take advantage of its user-friendly dashboard, easy-to-use editor and access to tons of ready-made plugins. Since many website owners have a few staff members that interact with their WordPress site, the built-in user management is a plus, too. With so many new users pouring in, we tend to give the same tips again and again in WP training. Here are some quick tips for WordPress beginners (based on WP version 4.4.2):
1. Expand the Editor Toolbar
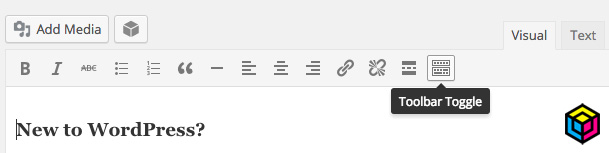
When you first log in as a new user, and you go to edit a Post or a Page, you are not seeing all the editor tools. Click the “Toolbar Toggle” button shown in the pic below to view them all.
Once you click it, you’ll see a new line of tools from now on. The extended toolbar includes a drop-down that let’s you select “Paragraph” (normal text) and “Heading” options from levels 1 through 6. You’ll also see buttons for underline (u), changing the font color (A) and indenting your text.
2. Make Titles and Sub-Titles
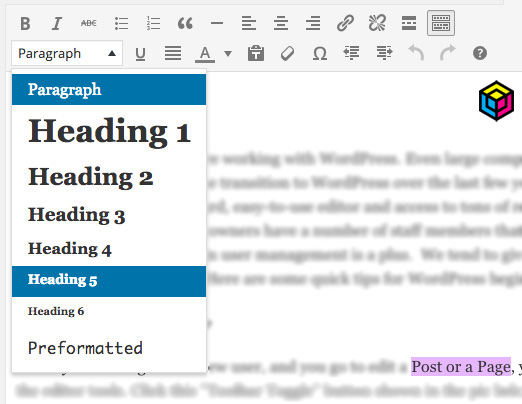
Once you’ve expanded the toolbar, you can now make titles and sub-titles (called Headers or “Headings”) in the big text box when you are editing. To do that, first highlight the text you want to change to a title or sub-title. Then, select a formatting option from the drop-down shown below. By default, all text is set at “Paragraph,” which is the standard body text for your site. Keep in mind that if you choose Heading 1, 2, 3, 4, 5 or 6, that the text you select will be on put on its own line, like a title, and separated from the paragraphs.
Without going deeper into how search engines and SEO works in this blog, it’s best to avoid more than one “Heading 1” title. Google and other search services look for the page or post title by seeking out “Heading 1” tag, which is usually the title of your blog (you enter this in the text field above the big text box). Therefore, when you are editing the body of your post, you should really only be using Heading 2 and lower (Heading 2-6) to avoid confusing search engines what your post is titled.
3. Add a Featured Image to Your Post
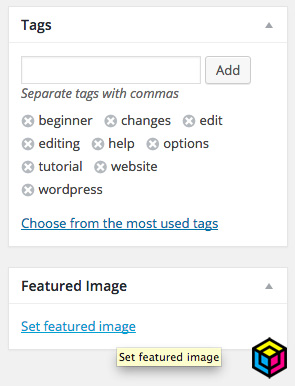
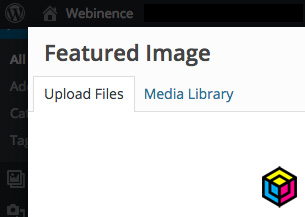
To add a featured image to your Post, click the “Featured Image” link in the box on the bottom right of the Edit Post page (see below). A large white box will pop-up with two main tabs: Upload and Media Library. The pop-up defaults to your Library, which shows all the images in your WordPress site so far. You may select an image already in your Library, and click the blue “Insert Media” in the bottom right of the pop-up.
Or, if you want to add a new image, click the Upload tab and simply drag and drop your pics into the pop-up box. Once you see your new image load up in your Media Library, select it and click the blue “Insert Media” at the bottom right. Be sure to save your Post for the featured image to take effect.
4. Make Sure Your Images are Web-Ready
A lot of new users tend to take really large photos from their digital cameras of iPhones, and drop them into the Media Library for use on their sites. Most of these are a lot larger than 1 MB, which is unnecessarily big for a website. The main problem with this is page loading time. By uploading very large photos, you are slowing down your website, especially for mobile users.
Re-size your pics to a reasonable width and height based on how you plan to use them. Then, convert them to web-ready versions (smaller in file size) using PhotoShop or http://tinyjpg.com. You can click on an image in the Media Library, and you will see the pic’s stats on the right, including dimensions and file size. Keep your file sizes down.
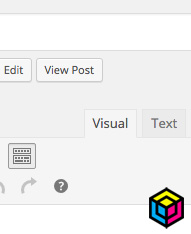
5. Switch Between the Visual and Text Editor
When you first log in to WP, the “Visual” editor is the default. If you want to see the underlying HTML code, simply click the “Text” tab above the text area (see below).
Hope these help! Have a question?
* Please do not reprint this tutorial or content without written permission and appropriate credits.